

1. 第11回 【WordPress】 WordPress Let’s Encryptを導入してhttp→https化する方法
環境:Debian 9 php 7.0 Apache 2.4.25 MySQL 5.7 Cocoon
目的:http→https化してセキュリティを高めること。
私にとって、この設定作業は困難を極めました。必ずバックアップを取ってから望むほうが良いと思います。
できる人には簡単な設定作業ですが、取り組み始めた完全素人の私にとっては不愉快極まりない設定でしたので、かなり細かく書いていきます。
Let’s Encrypt
2019年、「Googleが管理する鍵」としてGoogleのロードバランサーでも利用できるようになっていました。しかし、複数ドメイン(サブドメインを含む)には対応しておらず、入力項目が複数ありましたが、2つ目の欄にサブドメインを入力するとエラー画面になっていて、実用できるものではありませんでした。
ところが、Googleは「Google Trust Services」を立ち上げて自らが管理する認証局を設立しました。2020年に実際には切り替わったように感じました。あれっ?証明書の表記が「Let’s Encrypt」から「GTS」に変わってるぞと。
その認証局を利用しているのが「https://www.tokyo2020unofficial.com/」です。ロードバランサーを利用していれば無料で利用できます。
- tokyo2020unofficial.com
「wwwなし」用 - www.tokyo2020unofficial.com
「wwwあり」用 - storage.tokyo2020unofficial.com
「Google Cloud Storage」用
複数ドメインがこちらで発行されたSSL/TLS証明書になります。
Google公式「Google Trust Services」:「Googleが管理する鍵」
しかし、「GCP」(Google Cloud Platform)でロードバランサーを利用していない時には、この認証局を利用することができません。(設定項目がなくて)
それゆえに、無料の「Let’s Encrypt」を利用することになります。
これは、私が嫌いな「SSH」コマンドシェルでの作業になります。何度も失敗しました。苦労されている方も相当数おられるのではと思います。
Debian 9 互換性 Ubuntu 16.04 LTS
まず、これを知らなくて苦労しました。「Debian 9」の公式手順ではできなかったこと。色々探し回って調べると互換性のあるのが「Ubuntu 16.04 LTS」ということが分かりました。この公式手順だとできます。そこで、「Ubuntu 16.04 LTS向けの公式手順」に則って設定を行なっていきます。
- GCP「SSH」起動
- SSHUbuntu 16.04 LTS向けの公式手順
- SSHSSL/TLS証明書の取得
- ブラウザSSL/TLS証明書の確認
- 自サイトSSL/TLS証明書の確認
1.1 GCPで「SSH」表示
- GCPにアクセス
- 「メニュー」「Compute Engine」「VMインスタンス」の順番でクリックして、次へ進みます。

1.2 GCPで「SSH」起動
該当のVMインスタンス、右側の「SSH」をクリックして「SSHコマンドシェル」を起動します。

1.3 「Ubuntu 16.04 LTS向けの公式手順」
https://certbot.eff.org/#ubuntuxenial-apache
公式サイトには「Debian 9」を選択できる項目もありますが、「Debian 9」の手順ではできませんでした。
公式で比較してみると「Ubuntu 16.04 LTS」にはあって、「Debian 9」には記載されていないものが。
Add Certbot PPA
You’ll need to add the Certbot PPA to your list of repositories. To do so, run the following commands on the command line on the machine:
リポジトリのリストに「Certbot PPA」を追加する必要がある。そのコマンドだよって。
そりゃできなかったわけだよーと思う。必要なものが足りてなかったみたいなんだから。
まずアップデートから、
sudo apt-get update 開始
コマンドを入力します。
$ sudo apt-get update
1.4 sudo apt-get update 終了
まずアップデートすると下記の画面のようになります。
次のコマンドを入力します。
$ sudo apt-get install software-properties-common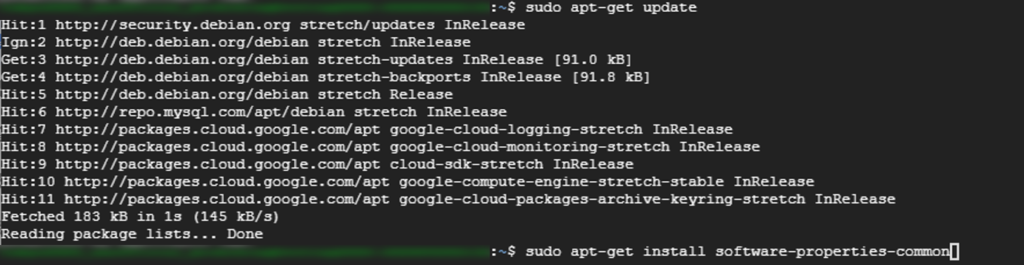
1.5 sudo apt-get install software-properties-common 途中
下記画面のようになります。
追加するにはディスク容量必要だけど良いかな?と聞かれるので、はい、と答えます。
「y」の後はどんな時も長いです。
y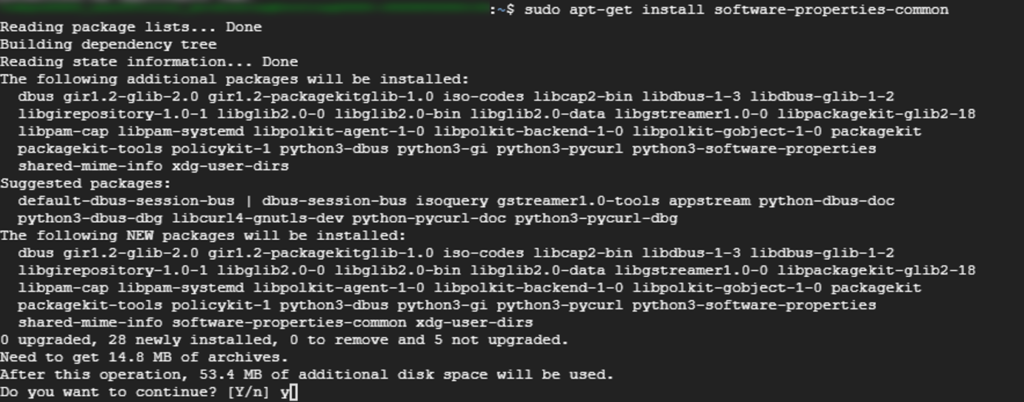
1.6 sudo apt-get install software-properties-common 終了
中略していますが、一通り終わったら下記画面のようになります。
次のコマンドを入力します。
$ sudo add-apt-repository ppa:certbot/certbot
1.7 sudo add-apt-repository ppa:certbot/certbot 途中
途中で続けるかどうか聞かれるので「Enter」キー押します。

1.8 sudo add-apt-repository ppa:certbot/certbot 終了
終了すると下記画面のようになります。
次のコマンドを入力します。
$ sudo apt-get update
1.9 sudo apt-get update 終了
終了したら下記画面のようになります。
どこだったかにアップデートしたら、アップグレードして、最新にしたほうが良いと書いてあったと思い、アップグレードのコマンドを入力します。
$ sudo apt-get upgrade
1.10 sudo apt-get upgrade 途中
下記画面のようになります。
追加するにはディスク容量必要だけど良いかな?と聞かれるので、はい、と答えます。
「y」の後はどんな時も長いです。
y
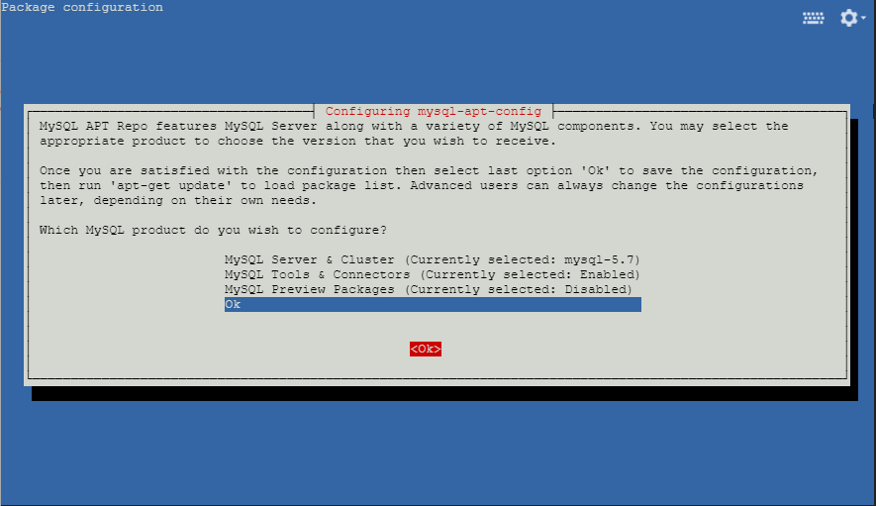
1.11 「MySQL」のアップグレード画面?
一度このまま「Enter」キー押します。

1.12 「MySQL 5.7」を選択
これって、確か「MySQL」のアップグレード画面だったような。

1.13 苦手な作業
「→」押して「青」、「→」押して「OK」が赤くなり、「Enter」キー押します。

1.14 一般設定の画面へ遷移
「↓」押して「OK」まで持っていって、「→」押して「OK」が赤くなり、「Enter」キー押します。
1.15 sudo apt-get upgrade 終了
「MySQL 5.7」はそのままに、他の部分はアップグレードできたのではないかと解釈しています。

1.16 証明書の取得 開始
証明書を取得するコマンドを入力します。
$ sudo certbot --apache
Saving debug log to /var/log/letsencrypt/letsencrypt.log
Plugins selected: Authenticator apache, Installer apache
Enter email address (used for urgent renewal and security notices) (Enter 'c' to
cancel):
「緊急の更新とセキュリティの通知のためのメールアドレスを聞かれるので「メールアドレス」を入力して「Enter」キーを押して次へ進みます。
1.17 規約に同意するか

Please read the Terms of Service at
#https://letsencrypt.org/documents/LE-SA-v1.2-November-15-2017.pdf. You must
agree in order to register with the ACME server at
#https://acme-v02.api.letsencrypt.org/directory

(A)gree/(C)ancel:
a規約に同意する「a」を入力、「Enter」キーを押して、次へ進みます。
1.18 メルマガやキャンペーンの通知に登録するか

どちらか「y」or「n」を入力、「Enter」キーを押して、次へ進みます。
1.19 独自ドメイン入力

No names were found in your configuration files. Please enter in your domain
name(s) (comma and/or space separated) (Enter 'c' to cancel):
tohyo2020.org,www.tohyo2020.org
サブドメインも含め、カンマ区切りで、「独自ドメイン」を入力、「Enter」キーを押して、次へ進みます。
1.20 適切なファイルを聞かれます

We were unable to find a vhost with a ServerName or Address of www.tohyo2020.org.
Which virtual host would you like to choose?

1: 000-default.conf | | | Enabled
2: 000-default-le-ssl.conf | tohyo2020.org | HTTPS | Enabled

Select the appropriate number [1-2] then [enter] (press 'c' to cancel): 2
適切なファイルは「1」or「2」どちらかと聞かれるので、該当する「2」を入力して「Enter」キーを押して次へ進みます。
1.21 http→httpsへの301リダイレクト

Please choose whether or not to redirect HTTP traffic to HTTPS, removing HTTP access.

1: No redirect - Make no further changes to the webserver configuration.
2: Redirect - Make all requests redirect to secure HTTPS access. Choose this for
new sites, or if you're confident your site works on HTTPS. You can undo this
change by editing your web server's configuration.
「1」を入力して「Enter」キーを押して次へ進みます。
http→httpsへの301リダイレクトをするかどうか聞かれるので「リダイレクトしない」を選択します。まだWordPressがhttpsでのアクセスができるかどうか確認できていないため。
1.22 SSL/TLS証明書 取得完了

Congratulations! You have successfully enabled https://tohyo2020.org and
https://www.tohyo2020.org
You should test your configuration at:
#https://www.ssllabs.com/ssltest/analyze.html?d=tohyo2020.org
#https://www.ssllabs.com/ssltest/analyze.html?d=www.tohyo2020.org
↑SSL証明書が有効であることを確認できます。

IMPORTANT NOTES:
Congratulations! Your certificate and chain have been saved at:
/etc/letsencrypt/live/tohyo2020.org/fullchain.pem
Your key file has been saved at:
/etc/letsencrypt/live/tohyo2020.org/privkey.pem
↑SSL証明書が保存されている場所も記載されています。

Your cert will expire on 2020-08-30. To obtain a new or tweaked
version of this certificate in the future, simply run certbot again
with the "certonly" option. To non-interactively renew all of
your certificates, run "certbot renew"
↑「certbot renew」で更新できることも記載されています。

If you like Certbot, please consider supporting our work by:
Donating to ISRG / Let's Encrypt: https://letsencrypt.org/donate
Donating to EFF: https://eff.org/donate-le
1.23 SSL証明書の有効確認
「wwwなし」

1.24 SSL証明書の有効確認
「wwwあり」

どちらも有効であることが確認できます。
1.25 更新可能かどうかの確認
本当に証明書が更新できるか「実際には更新しない」コマンドで確認します。
$ sudo certbot renew --dry-run
Saving debug log to /var/log/letsencrypt/letsencrypt.log

Processing /etc/letsencrypt/renewal/tohyo2020.org.conf
↑よく見るとこんなファイルが記載されていましたので、
WinSCPでこのファイルの中身を確認しました。
renew_before_expiry = 30 days
version = 0.28.0
archive_dir = /etc/letsencrypt/archive/tohyo2020.org
cert = /etc/letsencrypt/live/tohyo2020.org/cert.pem
privkey = /etc/letsencrypt/live/tohyo2020.org/privkey.pem
chain = /etc/letsencrypt/live/tohyo2020.org/chain.pem
fullchain = /etc/letsencrypt/live/tohyo2020.org/fullchain.pem
有効期限が切れる30日前に更新する
と書いてあったので、自動更新設定をしてはいません。

Cert not due for renewal, but simulating renewal for dry run
Plugins selected: Authenticator apache, Installer apache
Renewing an existing certificate
Performing the following challenges:
http-01 challenge for tohyo2020.org
http-01 challenge for www.tohyo2020.org
Waiting for verification…
Cleaning up challenges

new certificate deployed with reload of apache server; fullchain is
/etc/letsencrypt/live/tohyo2020.org/fullchain.pem


** DRY RUN: simulating 'certbot renew' close to cert expiry
** (The test certificates below have not been saved.)
Congratulations, all renewals succeeded. The following certs have been renewed:
/etc/letsencrypt/live/tohyo2020.org/fullchain.pem (success)
** DRY RUN: simulating 'certbot renew' close to cert expiry
** (The test certificates above have not been saved.)
1.26 「http」でアクセス
「保護されていない通信」として表示されたままです。

1.27 「https」でアクセス
「https」でアクセスしようとすると、すでに「https」の候補が出てきました。

1.28 鍵マークの確認
「保護されていない通信」→「鍵マーク」

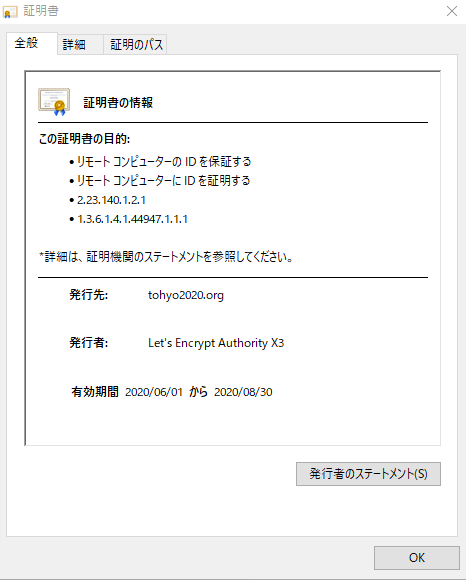
1.29 SSL/TLS証明書の確認
「鍵マーク」クリックして内容を確認します。
- 発行先:tohyo2020.org
- 発行者:Let’s Encrypt
- 有効期限:3ヶ月間
1.30 さいごに
「Let’s Encrypt」を利用した「https化」がこんなに大変だと思いませんでした。
見ているだけと、実際にやってみるのとでは、違うんだなぁ。新型コロナ、自粛要請、緊急事態宣言、行動自粛、おかげで色々なことを集中的に勉強できる機会を得た気がします。
【コメント】 ※「メールアドレス不要」